
Healing, Hunger & Cooking Guide
A repeatable field-to-Walker meal loop for hunger, recovery, bonuses, and home-grown ingredients.
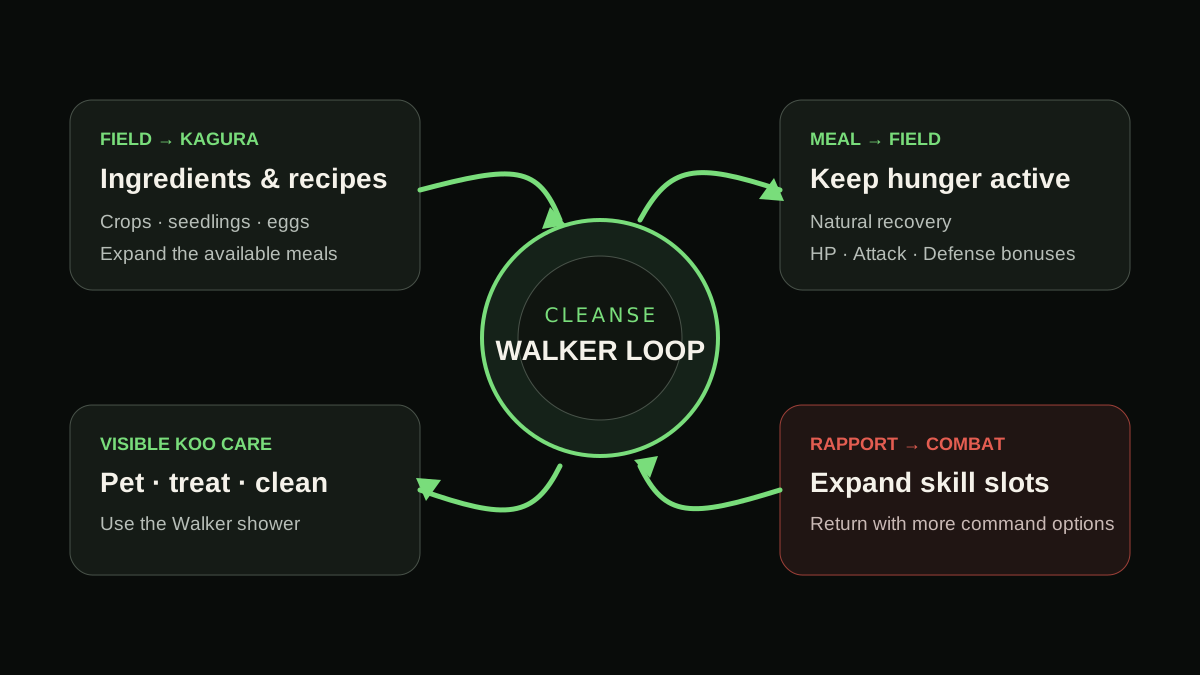
Table of contents
Keep the hunger gauge working
Emma and Koo naturally recover from wounds only while the hunger gauge is not empty. That makes hunger part of survival rather than a decorative food meter. Check it before you blame a campsite, difficulty setting, or combat build for missing recovery.
Use a simple field rule:
- Look at current health and hunger before leaving a safe point.
- Carry a meal instead of waiting for the gauge to fail during a difficult route.
- After eating, confirm both the hunger state and any visible meal bonus.
- Recheck after a long exploration chain or repeated encounter attempts.
The page does not need an invented drain rate to be useful: an empty gauge stops the natural recovery loop, and a prepared meal restores your ability to manage it.
Build a repeatable meal loop
Kagura cooks with ingredients found in the field. Recipes expand the meals she can prepare, and engaging with her improves her culinary ability. A clean loop is:
Explore → collect ingredients or recipes → return to Kagura → prepare a meal → confirm hunger and bonuses → leave with a replacement plan.
Food can provide bonuses to visible stat families including HP, Attack, and Defense. Read the meal’s current description before choosing it. Pick for the next task:
| Next task | Meal question |
|---|---|
| Learning a dangerous encounter | Does the meal improve survival long enough to practice? |
| Clearing ordinary enemies | Does it support the attack pattern you will actually use? |
| Long exploration route | Will hunger remain active through the route and return? |
| Testing equipment or skills | Can you keep the same meal so the comparison stays controlled? |
Changing the meal, weapon, difficulty, and settings together makes it harder to understand why a result changed.
Use the Cleanse Walker as a preparation checkpoint
The Cleanse Walker is more than a travel backdrop. It connects Kagura’s cooking, crops, Koo care, and the next field attempt. Before leaving, check:
- whether a useful recipe or ingredient created a new meal option;
- whether planted crops or seedlings have completed their harvest time;
- whether eggs or other home-grown ingredients are available;
- whether Koo needs a treat, attention, or cleaning;
- whether you have a meal plan for the next route rather than only the current health bar.
This turns every return into a short preparation loop instead of several disconnected menus.
Treat crops, seedlings, and eggs as inputs
Kagura’s available meals can grow through ingredients you gather and produce at the Walker. Crops have different harvest times, seedlings expand what can be grown, and a chicken can provide eggs. Use the visible timer or ready state rather than assuming every crop follows the same cycle.
For completion, Green Thumb requires every seedling and Gourmand requires every book on cooking and crops. Those achievements identify the long-term families, but they do not reveal the exact total, location, or fastest farming order. Track each visible name once instead of relying on memory.
Separate recovery, bonuses, and care
These systems touch each other but answer different questions:
- Hunger keeps natural recovery available.
- Meals can add stat bonuses for the next task.
- Recipes and ingredients expand what Kagura can prepare.
- Crops, seedlings, and eggs feed the ingredient supply.
- Koo care raises a relationship track that also affects his combat options.
If your immediate goal is Koo rather than food, continue with Koo Rapport, Care & Skill Slots. For field ingredient discovery, use Traversal, Koo Scent & Exploration.
End each return with five checks
- Hunger is not empty.
- The selected meal matches the next task.
- A replacement meal or ingredient path is clear.
- Ready crops, seedlings, or eggs have been checked.
- Koo’s care has not been skipped while moving between menus.
That checklist is enough to make the loop reliable while the exact recipe and ingredient database is still being observed.
Related guides
Beast of Reincarnation First Hours Guide
Learn the opening Emma-and-Koo loop, set a safe baseline, and avoid wasting early upgrades.
Read guideTraversal, Koo Scent & Exploration Guide
Read Koo’s field signals, use Emma’s hair traversal actions, and turn vertical routes into safe movement or combat openings.
Read guideKoo Rapport, Care & Skill Slots
Use petting, treats, cleaning, and the Cleanse Walker loop to raise rapport and expand Koo’s combat options.
Read guide