
Combat, Parry & Koo Commands
The core Emma-and-Koo decision loop, with no fabricated frame windows.
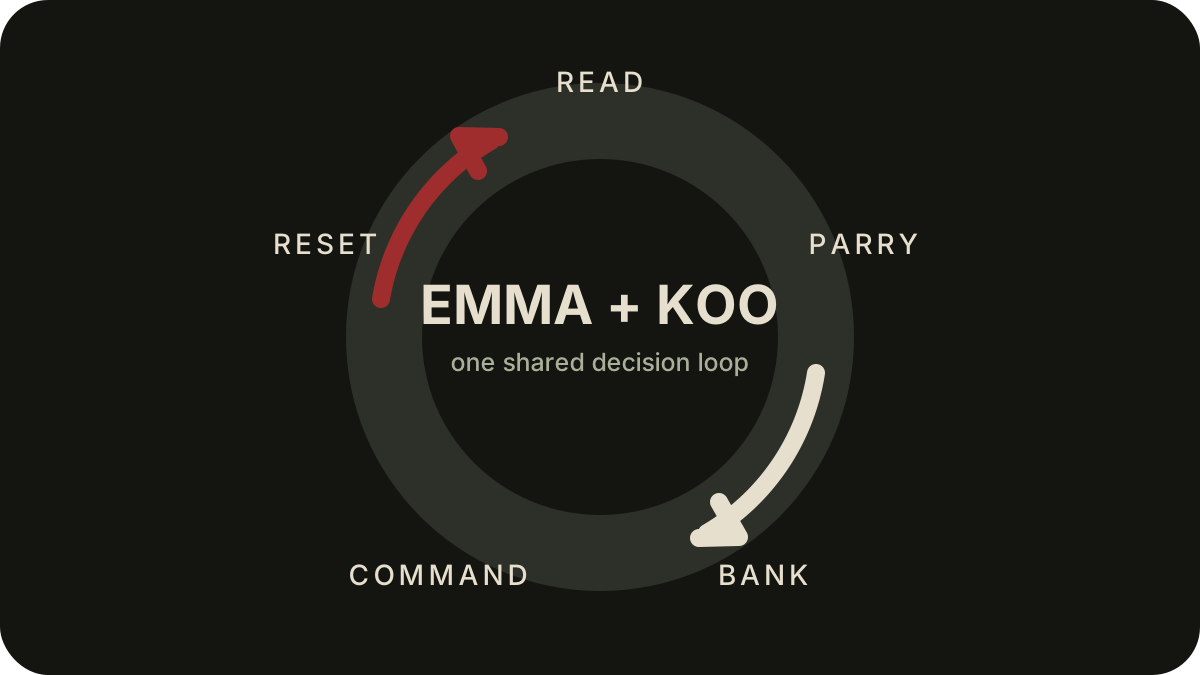
Table of contents
The fight has two tempos
Emma acts in real time with her sword. Koo contributes abilities through a command system. A successful parry—a Just Guard—earns Fluorescence Points (FP) that can be spent on Koo's skills. Opening Koo's command menu slows time so you can turn a defensive success into a tactical choice.
That relationship is the core system:
Read → Just Guard → earn FP → choose a Koo command → reposition.
This is more useful than thinking of Koo as a cooldown that should be pressed whenever it lights up.
Default PlayStation combat reference
The default PlayStation layout gives a concrete reference for the major actions. Use the prompts shown by your platform or custom bindings when they differ.
| Action | Default input | Player purpose |
|---|---|---|
| Sword attack or Takedown prompt | R1 | Build ordinary pressure; use the prompted Takedown when the Down Gauge breaks. |
| Block and parry | L1 | Defend and time the Just Guard that earns FP. |
| Dodge | Circle | Leave a bad angle or avoid an attack you are not prepared to parry. |
| Nushi Skills and Blade Arts | Square | Use Emma's acquired or equipped action layer. |
| Koo command menu | Triangle | Slow time and choose a command or Bloom Art. |
| Entanglement Overdrive | L3 + R3 | Activate Emma's time-slowing entanglement state when available. |
Ranged weapons include arrows and bolts. They can create pressure or a headshot opportunity before an enemy reaches sword range. Stealth and vertical routes can also produce an instant kill against an unaware ordinary target. These are openings into the combat loop, not replacements for it when a full encounter begins.
Break the Down Gauge, then recognize the Takedown
Enemies have a Down Gauge that can be reduced through attacks. When it breaks, the target is open to a Takedown. The useful decision sequence is:
- Maintain a readable angle instead of extending a blind string.
- Use attacks, a projectile opening, or a successful defensive exchange to build pressure.
- Watch the stagger state rather than only the health bar.
- Take the visible Takedown prompt with R1 on the default PlayStation layout.
- Reassess the remaining enemies before starting the next string.
Against a group, a Takedown can change spacing as much as damage. Confirm where Emma ends the animation and whether another attacker has already entered range.
Practice the loop in layers
Layer 1: read one attack
Choose an enemy with a clear wind-up. Stop extending your own string and watch the cue. Your first objective is recognition, not damage.
Layer 2: attempt the Just Guard
Use the visual and animation cue available in the game. This Wiki does not publish an exact frame window because no versioned frame test closes that value. If you block too early or take the hit, adjust from the result you can see rather than from an unproven number.
Layer 3: verify the resource
After a successful parry, notice the FP available for Koo. Do not mash through the result. The earned resource is the bridge between Emma's timing and Koo's tactics.
Layer 4: use the slowed command decision
Open the command menu and ask what the situation needs: control, pressure, safety, or position. On PlayStation, the default example uses Triangle; use the binding shown by your current platform and layout. If the menu or prompts behave incorrectly, fix the input path in Controls & Input Troubleshooting before practicing combat.
Bloom Arts can include a short timing action after selection. Treat that input as part of the chosen command: read the prompt, complete it deliberately, then verify the result before spending the next FP. Koo can also attack directly, so his life bar, position, and current command set belong in the same battlefield scan as Emma's health and stagger pressure.
Layer 5: reset the position
A command is not the end of the loop. Reposition so the next enemy cue is visible, then repeat. The goal is a stable decision rhythm, not a single perfect counter.
Three common failure patterns
| What happens | Likely training mistake | Better next attempt |
|---|---|---|
| You attack through every wind-up | Damage string owns your attention | Stop after one safe action and wait for the chosen cue. |
| You parry but forget Koo | Defense is disconnected from resource use | Open the command menu immediately after the next clear success. |
| You spend without looking | Koo is treated as an automatic button | Name the purpose—control, pressure, safety, or position—before selecting. |
Difficulty should preserve the lesson
If an encounter kills you before you can identify the cue, lower pressure long enough to practice the layer that is failing. If the encounter lets you ignore Koo entirely, increase pressure or set yourself a constraint to complete the full loop. Difficulty & Accessibility explains this calibration without pretending the three modes have published numeric modifiers.
Connect combat to progression
Emma and Koo do not share one anonymous skill tree. Their progression paths reinforce different halves of the partnership. Before spending, decide whether you are improving Emma's action, Koo's command, the resource bridge between them, or recovery after the exchange.
Continue with Skill Trees & Bloom Arts for the progression map and Weapons, Koo Charms & Spirit Stones for the equipment taxonomy. Neither page invents exact values that the current data set cannot reproduce.
For the field actions that create projectile angles or falling assassinations, continue with Traversal, Koo Scent & Exploration. For the relationship track that expands Koo's skill slots, use Koo Rapport, Care & Skill Slots.
What remains intentionally unclaimed
There is no frame-data table, universal “best” command rotation, enemy-by-enemy parry window, or damage formula here. Those require direct, versioned observation. The loop above is still actionable because every step is visible in play and tied to the game's documented Emma-and-Koo design.
Related guides
Skill Trees & Bloom Arts
Understand how Emma’s Blade Arts and Koo’s Bloom Arts form two connected progression tracks.
Read guideWeapons, Koo Charms & Spirit Stones
Distinguish Emma’s weapons and Spirit Stones from Koo Charms before comparing loadouts.
Read guideDifficulty & Accessibility Guide
Choose a difficulty goal and review the accessibility options available at launch.
Read guide